

Integrating Dagster as a modern data orchestration framework in HPE Private Cloud AI
April 19, 2026HPE Private Cloud AI (PCAI) provides a curated set of pre‑integrated orchestration and machine‑learning (ML) frameworks, including Airflow, Kubeflow, Spark and Ray, to streamline the development and operationalization of AI workloads. However, teams that require stronger data‑centric orchestration, asset lineage, and reproducibility may find gaps in the existing toolchain. Traditional task‑based orchestrators such as Airflow don’t always provide the asset‑level visibility, modularity, or developer‑friendly workflow needed for modern data engineering practices.
This blog post introduces Dagster as an additional, asset‑oriented orchestration framework that augments the existing HPE Private Cloud AI tool stack without replacing any component. Using the Import Framework, Dagster can be deployed within minutes and integrated seamlessly into the HPE Private Cloud AI environment. Dagster’s modular architecture cleanly separates the infrastructure layer from the user code layer, allowing the user code package to be built as an independent container image, pushed to the local PCAI image registry, and deployed entirely within the HPE Private Cloud AI boundary. This integration approach reinforces data protection and supports strict data sovereignty requirements. Once integrated, Dagster provides advanced orchestration capabilities, including asset-level lineage tracking, deterministic reproducibility, and comprehensive observability. Its developer‑focused design enables teams to build, execute, and monitor data assets with greater reliability and maintainability, making it a valuable optional addition within HPE Private Cloud AI for workflows that benefit from modern data‑centric orchestration.
Why Dagster?
Dagster is a modern data orchestration framework centered on the concept of data assets. Rather than focusing primarily on tasks, Dagster encourages teams to model pipelines as interconnected datasets with explicit lineage and dependencies. Its strong developer oriented features, such as type‑checking, local development tooling, built‑in testing, and rich observability, make it especially effective for contemporary data stacks involving dbt, cloud warehouses, and ML workflows. It’s widely used by data engineering and analytics teams to make pipelines more reliable, observable, and maintainable.
Dagster does not replace existing orchestrators such as Airflow, Kubeflow, or Ray. Instead, it complements them by offering a more data‑centric option for teams that prioritize lineage, observability, and long‑term maintainability. In practice, Dagster, Airflow, and other orchestration tools often coexist within the same ecosystem, each bringing strengths suited to different workflow styles. Dagster excels in asset‑driven, lineage‑aware environments, while tools like Airflow remain reliable choices for task‑driven scheduling with extensive integrations. Rather than competing, these tools work together to give teams the flexibility to choose the orchestration model that best fits each part of their data platform.
The following sections describe the process for integrating Dagster into HPE Private Cloud AI using the Import Framework. Once integrated, Dagster becomes an additional orchestration framework within the PCAI environment, providing users with more options to select the approach that best aligns with their workflow and orchestration requirements.
Prerequisites
Ensure that the following prerequisites are fulfilled:
- HPE Private Cloud AI version 1.5.0 or later, running HPE AI Essentials version 1.9.1 or later.
- Access to an HPE Private Cloud AI workspace (with the Private Cloud AI Administrator role), allowing to perform administrative operations.
- Docker Engine version 27.3.1 or later, including the default docker CLI, which will be used for building and pushing Dagster user code images.
The deployment examples in the following sections use the kubectl CLI and kubeconfig to display deployment details in the PCAI Kubernetes (K8s) cluster for illustration purposes only. Direct cluster access via kubectl is generally not required, as the full framework setup can be completed through the Import Framework UI.
Integrate Dagster framework using the Import Framework
The official Dagster Helm charts contain the main dagster chart and the dagster-user-deployments subchart. The dagster chart deploys the core Dagster infrastructure, specifically the Dagster Webserver and the Dagster daemon, using prebuilt images available from DockerHub. The dagster-user-deployments subchart, by contrast, is responsible for deploying Dagster user code, which contains the user-defined pipelines and asset definitions. Because this code is user-specific, customers must build their own user code image and use that image when deploying Dagster user code. In many cases, customers prefer to store this image locally within their environment.
The following sections describe how to build a sample user code image, deploy Harbor and configure it as the local image registry within HPE Private Cloud AI, and push the built Dagster user code image to Harbor so it can be used for the Dagster deployment.
Build the Dagster user code image
This section describes the process for building the Dagster user code image in preparation for the Dagster deployment. For demonstration purposes, the 'iris_analysis' example project from the official Dagster GitHub repository is used as the sample for the user code image build.
$ cd examples/deploy_k8s/
$ ls -al
total 24
drwxrwxr-x  3 guoping guoping 4096 mars  20 14:01 .
drwxrwxr-x 37 guoping guoping 4096 mars  19 11:13 ..
-rw-rw-r--  1 guoping guoping  516 mars  20 14:01 Dockerfile
drwxrwxr-x  2 guoping guoping 4096 mars  19 11:13 iris_analysis
-rw-rw-r--  1 guoping guoping  361 mars  19 11:13 pyproject.toml
-rw-rw-r--  1 guoping guoping    0 mars  19 11:13 py.typed
-rw-rw-r--  1 guoping guoping  477 mars  19 11:13 README.md
The following Dockerfile is used to build the sample Dagster user code image. In addition to installing the required libraries (e.g., dagster, dagster-postgres, dagster-k8s, and pandas), be sure to update the file paths and port settings to match you own Dagster project.
$ cat Dockerfile
FROM python:3.11
COPY . /
ENV PYTHONUNBUFFERED=1
RUN pip install --upgrade pip
RUN \
    pip install \
        dagster \
        dagster-postgres \
        dagster-k8s \
        pandas
WORKDIR /iris_analysis/
EXPOSE 80
Run the following Docker command to build the image 'pcaidemo/user-code-example' with the tag '1.12.19'.
$ docker build . -t pcaidemo/user-code-example:1.12.19 [+] Building 188.9s (8/10) docker:default => [internal] load build definition from Dockerfile 0.1s => => transferring dockerfile: 555B 0.0s => [internal] load metadata for docker.io/library/python:3.11 6.7s => [auth] library/python:pull token for registry-1.docker.io � 0.0s => [internal] load .dockerignore 0.0s [+] Building 271.3s (9/10) docker:default => [internal] load build definition from Dockerfile 0.1s => => transferring dockerfile: 555B 0.0s => [internal] load metadata for docker.io/library/python:3.11 6.7s => [auth] library/python:pull token for registry-1.docker.io 0.0s => [internal] load .dockerignore 0.0s [+] Building 280.0s (11/11) FINISHED docker:default => [internal] load build definition from Dockerfile 0.1s => => transferring dockerfile: 555B 0.0s => [internal] load metadata for docker.io/library/python:3.11 6.7s => [auth] library/python:pull token for registry-1.docker.io 0.0s => [internal] load .dockerignore 0.0s => => transferring context: 2B 0.0s => [internal] load build context 0.1s => => transferring context: 2.08kB 0.1s => [1/5] FROM docker.io/library/python:3.11@sha256:ff461875d046c85ecc529e93cf2a0004f29df70566194936214115b36703d866 158.7s => => resolve docker.io/library/python:3.11@sha256:ff461875d046c85ecc529e93cf2a0004f29df70566194936214115b36703d866 0.0s => => sha256:ff461875d046c85ecc529e93cf2a0004f29df70566194936214115b36703d866 10.32kB / 10.32kB 0.0s => => sha256:990d2ceca3883d62ee15b9e7c06da32a9f9a6bb95d5c0b47548581e6e0a38d50 2.32kB / 2.32kB 0.0s => => sha256:e1388005fc3d7fd4f5611bd6b70464d8dc602a6189c9d5689def96add4b74a3a 6.35kB / 6.35kB 0.0s => => sha256:ee3a0e7d77f0c84203cab438fcf345647c8121bbd80506a3c692f8608a14c4f4 67.78MB / 67.78MB 17.9s => => sha256:8f6ad858d0a46fa8ee628532c70b8dc82d06179d543b0b09ec19fc03d4c5b373 49.30MB / 49.30MB 13.4s => => sha256:b012eb15dff0bce418c03ec940325aee6aa4300d771c325728855697e620c63a 25.62MB / 25.62MB � 5.8s => => sha256:8688d0f2f567884eb217c6f80efa063bdb13a1951e92e6c5cac1ae5b736f5e1b 236.08MB / 236.08MB 42.6s => => sha256:66063df90a44c93620e1790b680bad5509bc860518ee257a157d6262916b680a 6.09MB / 6.09MB 15.9s => => extracting sha256:8f6ad858d0a46fa8ee628532c70b8dc82d06179d543b0b09ec19fc03d4c5b373 31.6s => => sha256:1589b6e505d3cd8ceb2b87cebc53c22b3bd9b858def90d5c108605bbd58d8b28 23.98MB / 23.98MB 24.7s => => sha256:8cd65a420aac1587da1c19e7cc7bd6f61b226f69fe9ec6f9d3f6215b9bf33cf2 249B / 249B 18.8s => => extracting sha256:b012eb15dff0bce418c03ec940325aee6aa4300d771c325728855697e620c63a 10.8s => => extracting sha256:ee3a0e7d77f0c84203cab438fcf345647c8121bbd80506a3c692f8608a14c4f4 � 24.9s => => extracting sha256:8688d0f2f567884eb217c6f80efa063bdb13a1951e92e6c5cac1ae5b736f5e1b 66.5s => => extracting sha256:66063df90a44c93620e1790b680bad5509bc860518ee257a157d6262916b680a 1.4s => => extracting sha256:1589b6e505d3cd8ceb2b87cebc53c22b3bd9b858def90d5c108605bbd58d8b28 4.2s => => extracting sha256:8cd65a420aac1587da1c19e7cc7bd6f61b226f69fe9ec6f9d3f6215b9bf33cf2 0.0s => [2/5] COPY . / 4.1s => [3/5] RUN pip install --upgrade pip 19.0s => [4/5] RUN pip install dagster dagster-postgres dagster-k8s pandas 82.4s => [5/5] WORKDIR /iris_analysis/ 0.1s => exporting to image 8.5s => => exporting layers 8.3s => => writing image sha256:e5ccb2007d4d8eb9ab2d964c08a45d343a6775ceb7d012021902dc0dc51dc247 0.0s => => naming to docker.io/pcaidemo/user-code-example:1.12.19
Run the below command to verify the image 'pcaidemo/user-code-example' has been built with its proper tag '1.12.19'.
$ docker images
REPOSITORY                   TAG       IMAGE ID       CREATED              SIZE
pcaidemo/user-code-example   1.12.19   e5ccb2007d4d   About a minute ago   1.51GB
Set up Harbor as a local image registry
Harbor is an open-source container registry designed for cloud-native environments like K8s. It securely stores and manages container images with policies and role-based access control (RBAC), ensures images are scanned and free from vulnerabilities, and signs images as trusted.
You can install Harbor and set it up as a local image registry in HPE Private Cloud AI by following the instructions in the blog post Setting up Harbor as a local container registry in HPE Private Cloud AI.
After Harbor is deployed via the Import Framework, an imported Harbor tile appears under Tools & Frameworks.

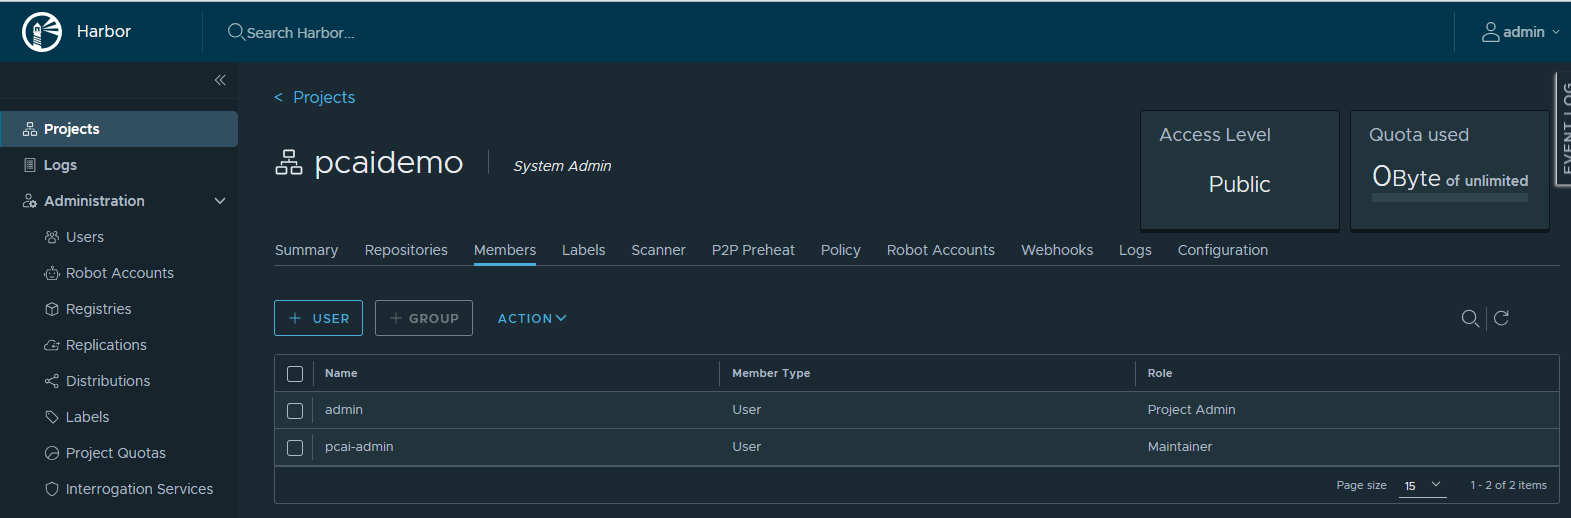
Click Open to launch the Harbor console. After creating a project (e.g., 'pcaidemo') under Projects and a user (e.g., 'pcai-admin') with the Maintainer role under Administration -> Users, add the user to the project 'pcaidemo' from its Members tab.
Push the Dagster user code image to Harbor
From the Linux client, run the following command to log in to the Harbor registry using the user credentials configured above.
$ docker login harbor.ai-application.pcai0104.ld7.hpecolo.net
Username: pcai-admin
Password:

WARNING! Your credentials are stored unencrypted in '/home/guoping/.docker/config.json'.
Configure a credential helper to remove this warning. See
https://docs.docker.com/go/credential-store/

Login Succeeded
Tag the built image with the Harbor registry URL (e.g., 'harbor.ai-application.pcai0104.ld7.hpecolo.net') and the project name 'pcaidemo'. Run the following command to push the image to the Harbor registry.
$ docker tag pcaidemo/user-code-example:1.12.19 harbor.ai-application.pcai0104.ld7.hpecolo.net/pcaidemo/user-code-example:1.12.19
$ docker push harbor.ai-application.pcai0104.ld7.hpecolo.net/pcaidemo/user-code-example:1.12.19
The push refers to repository [harbor.ai-application.pcai0104.ld7.hpecolo.net/pcaidemo/user-code-example]
5f70bf18a086: Pushed
72974f5579e5: Pushed
e4701c8f7c5b: Pushed
2b8a04da403b: Pushed
4ec5e33e2b38: Pushed
5c262981bdb5: Pushed
30d39f2c6455: Pushed
6afcfc3ecd04: Pushed
817e939a94eb: Pushed
dd6e353abeff: Pushed
c5864b4cf4c9: Pushed
1.12.19: digest: sha256:b877e86abeea7c509dfb029a1d9fba51c45aaa9e84ca84399a92e79c2e2ac442 size: 2634
Run the following command to view the repositories from the Harbor registry.
$ curl -k -sS --user 'pcai-admin:<hidden>' https://harbor.ai-application.pcai0104.ld7.hpecolo.net/v2/_catalog | jq
{
  "repositories": [
    "pcaidemo/user-code-example"
  ]
}
In the Harbor console, under the Repositories tab of the project 'pcaidemo', the image 'pcaidemo/user-code-example' appears in the list.
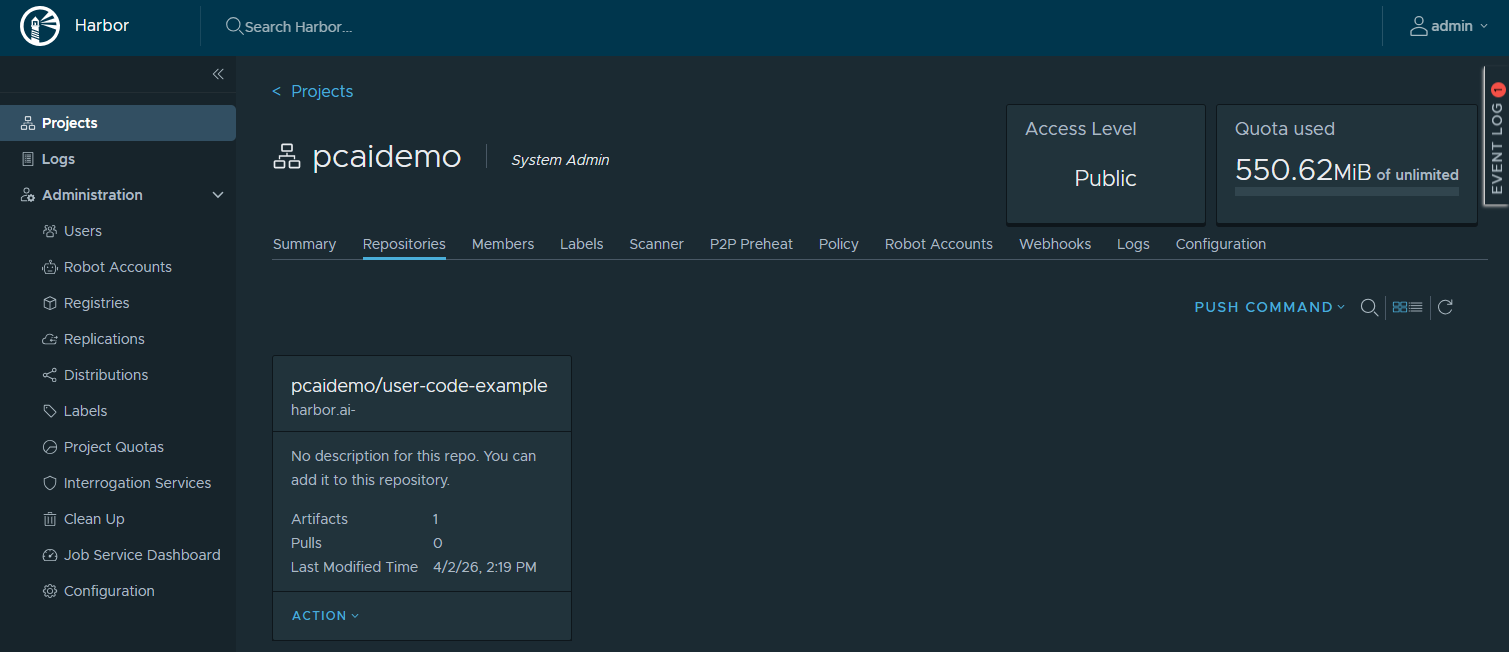
This user code image, once pushed to the local Harbor registry, will be used for the Dagster user code deployment.
Deploy Dagster framework
Based on the official Dagster Helm charts, a revised version, available in the GitHub repository pcai-helm-examples, provides HPE Private Cloud AI compatible deployment configurations. This updated chart includes the required Istio VirtualService and Kyverno ClusterPolicy manifests to ensure alignment with PCAI’s service mesh and policy controls. It also incorporates modifications for pulling the user code image from the local Harbor registry.
Follow the steps below to deploy Dagster into HPE Private Cloud AI using the Import Framework.
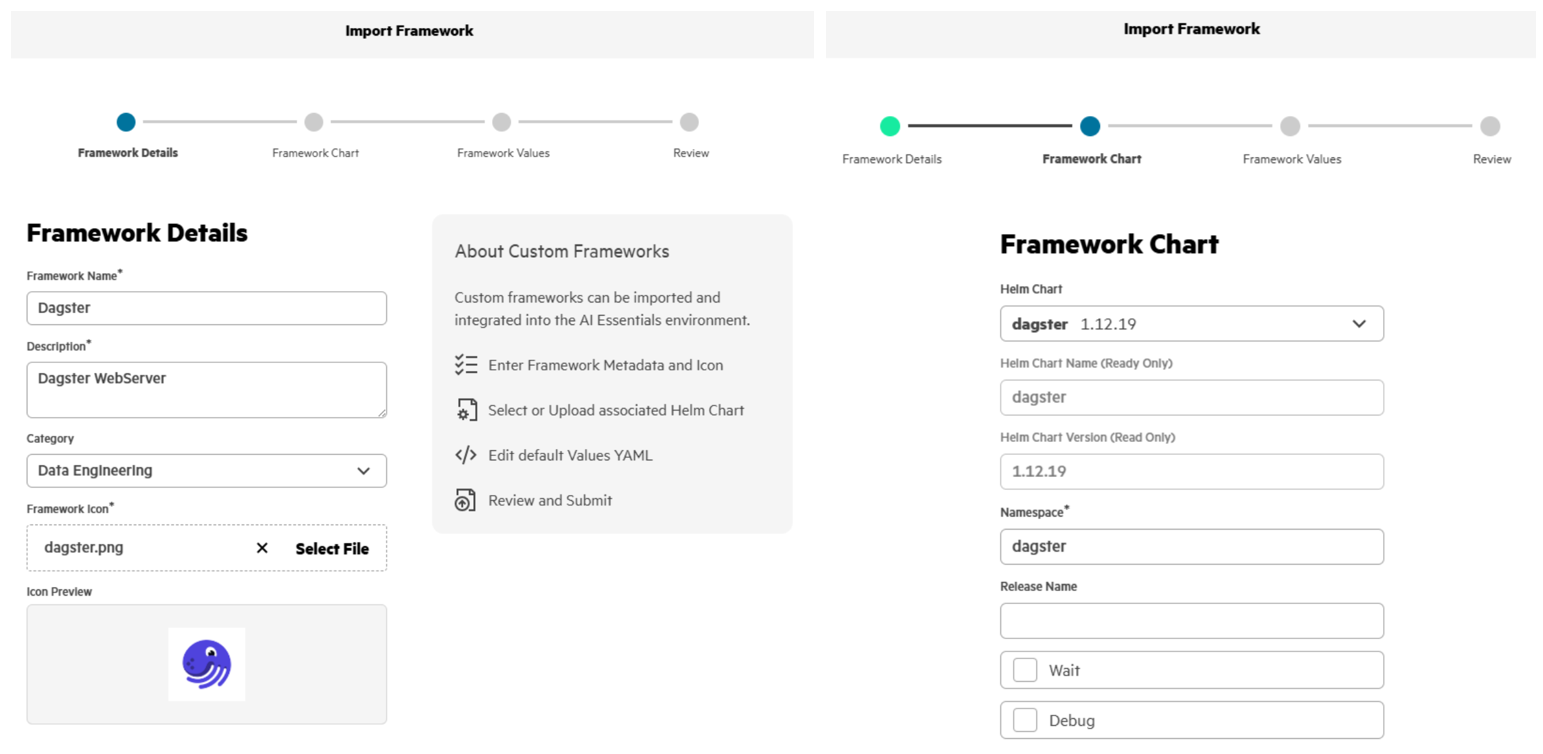
- In the PCAI left navigation panel, select Tools & Frameworks. Click Import Framework.

- By following the Import Framework wizard workflow, Dagster can be deployed into the PCAI environment within minutes.
- Run the following commands to verify the Dagster deployment in the namespace 'dagster' of the PCAI K8s cluster.
$ kubectl get all -n dagster
NAME                                                                  READY   STATUS    RESTARTS   AGE
pod/dagster-daemon-66c46866f8-sc4n7                                   1/1     Running   0          30h
pod/dagster-dagster-user-deployments-k8s-example-user-code-1-8k86gs   1/1     Running   0          30h
pod/dagster-dagster-webserver-66447f9b57-9rzmh                        1/1     Running   0          30h
pod/dagster-postgresql-0                                              1/1     Running   0          30h

NAME                                  TYPE        CLUSTER-IP   EXTERNAL-IP   PORT(S)    AGE
service/dagster-dagster-webserver     ClusterIP   10.96.1.6    <none>        80/TCP     30h
service/dagster-postgresql            ClusterIP   10.96.3.66   <none>        5432/TCP   30h
service/dagster-postgresql-headless   ClusterIP   None         <none>        5432/TCP   30h
service/k8s-example-user-code-1       ClusterIP   10.96.3.96   <none>        3030/TCP   30h

NAME                                                                       READY   UP-TO-DATE   AVAILABLE   AGE
deployment.apps/dagster-daemon                                             1/1     1            1           30h
deployment.apps/dagster-dagster-user-deployments-k8s-example-user-code-1   1/1     1            1           30h
deployment.apps/dagster-dagster-webserver                                  1/1     1            1           30h

NAME                                                                                  DESIRED   CURRENT   READY   AGE
replicaset.apps/dagster-daemon-66c46866f8                                             1         1         1       30h
replicaset.apps/dagster-dagster-user-deployments-k8s-example-user-code-1-85d9d56f44   1         1         1       30h
replicaset.apps/dagster-dagster-webserver-66447f9b57                                  1         1         1       30h

NAME                                  READY   AGE
statefulset.apps/dagster-postgresql   1/1     30h
Access Dagster framework
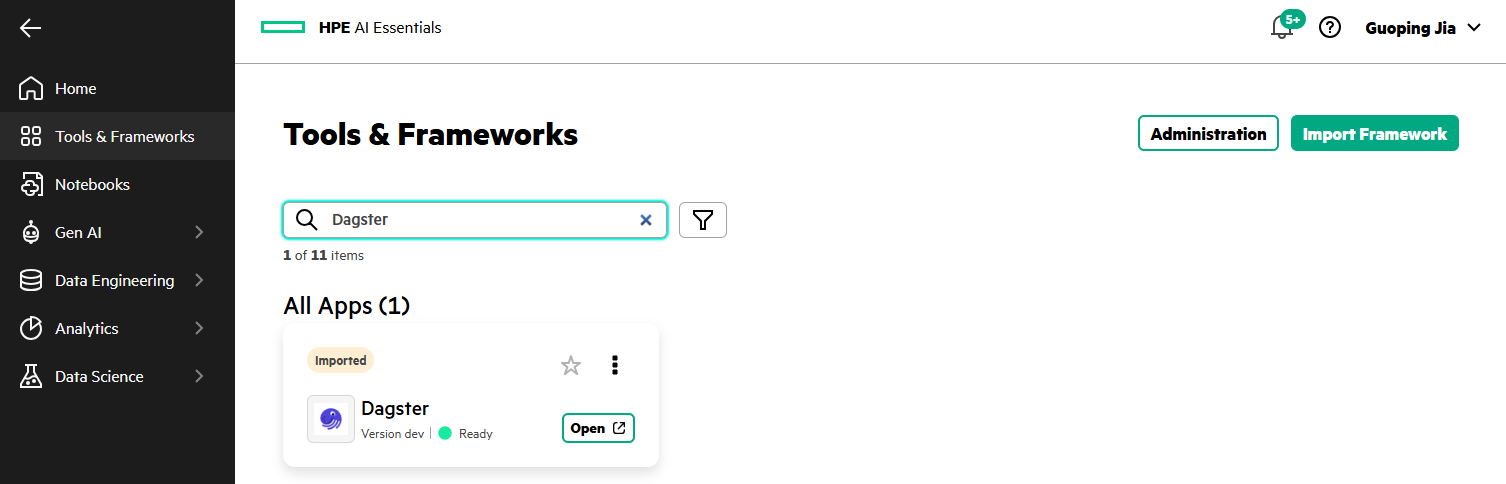
After Dagster is deployed via the Import Framework, an imported Dagster tile appears under Tools & Frameworks.
Connect to Dagster deployment
Clicking Open on the Dagster tile launches the Dagster Webserver and directs you to the Overview page.

Navigate to Deployment and open the Code locations tab. The entry 'k8s-example-user-code-1' shows the user code image 'harbor.ai-application.pcai0104.ld7.hpecolo.net/pcaidemo/user-code-example:1.12.19' pulled from the Harbor registry.

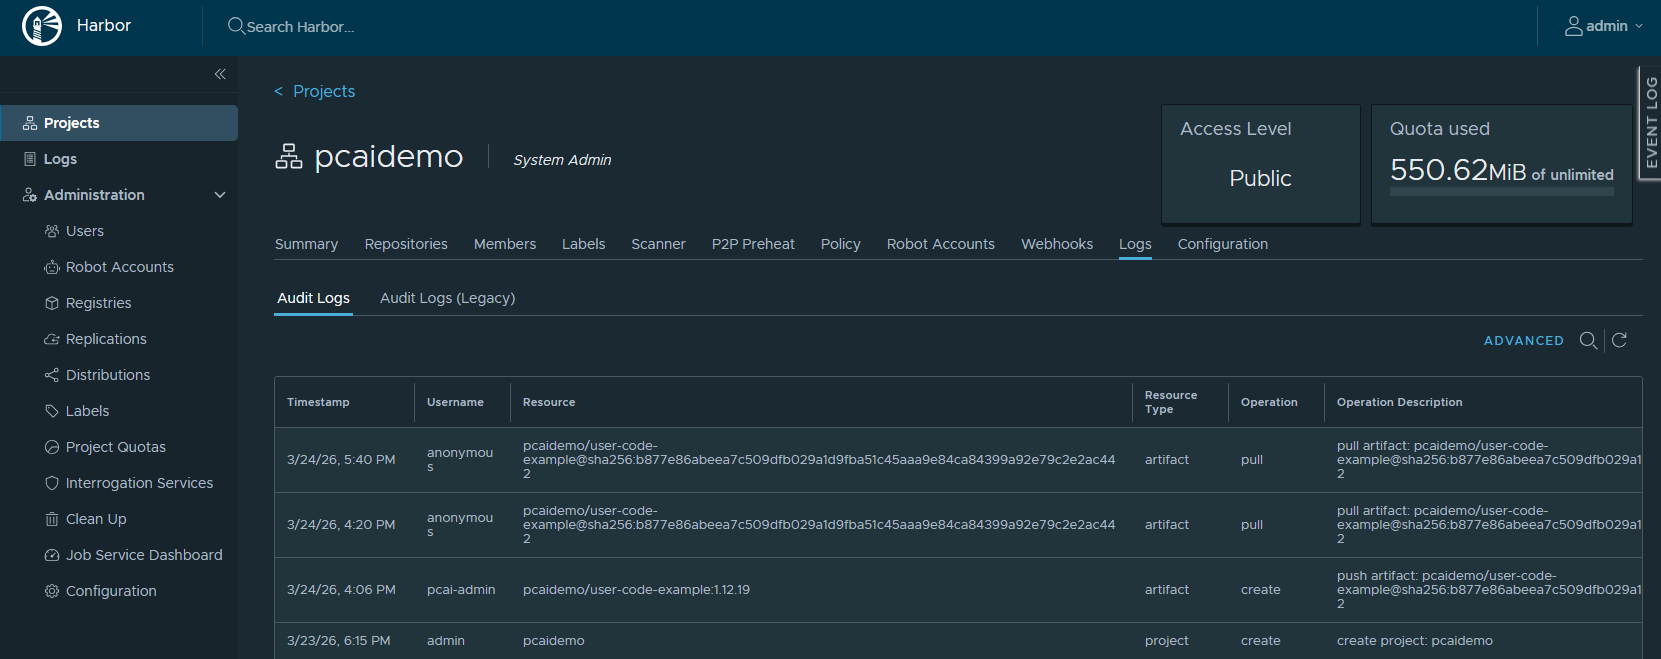
In the Harbor console, under the Logs tab of the project 'pcaidemo', you can see the artifact pull operations for the image 'pcaidemo/user-code-example'.
Materialize Dagster assets
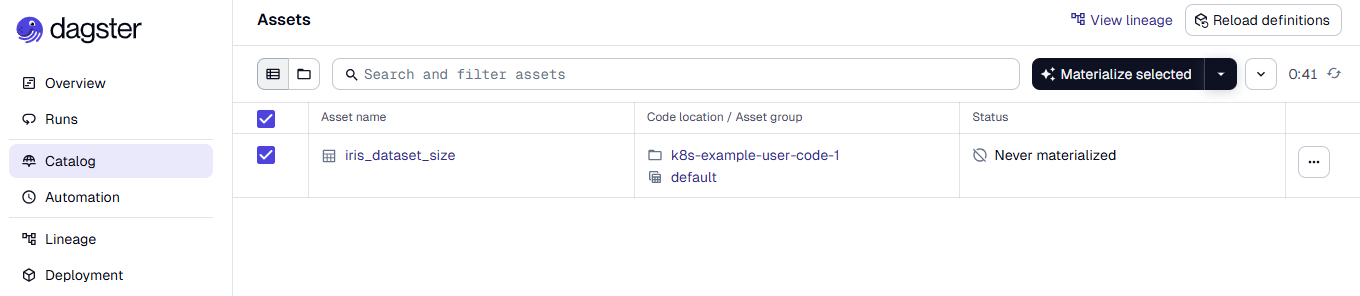
In the Dagster Webserver, navigate to Catalog, select the asset 'iris_dataset_size', and click the Materialize selected button. This triggers the materialization process for the asset 'iris_dataset_size'.
Run the following command to view the K8s job that was started on the cluster to materialize the asset.
$ kubectl get jobs -n dagster
NAME                                               STATUS     COMPLETIONS   DURATION   AGE
dagster-run-044deadf-141d-4b25-89b1-dd74f0a44f89   Complete   1/1           8s         25s
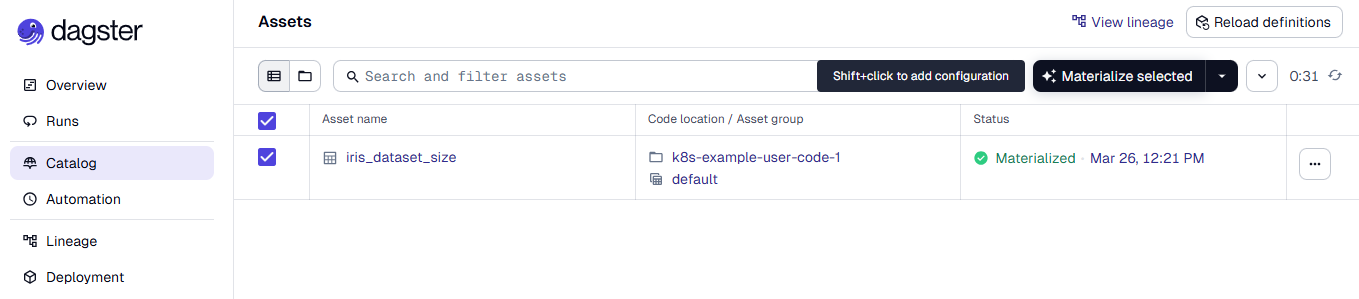
Once the K8s job completes, the asset 'iris_dataset_size' appears with a Materialized status in the Catalog.
Click the asset 'iris_dataset_size' to view its overview.
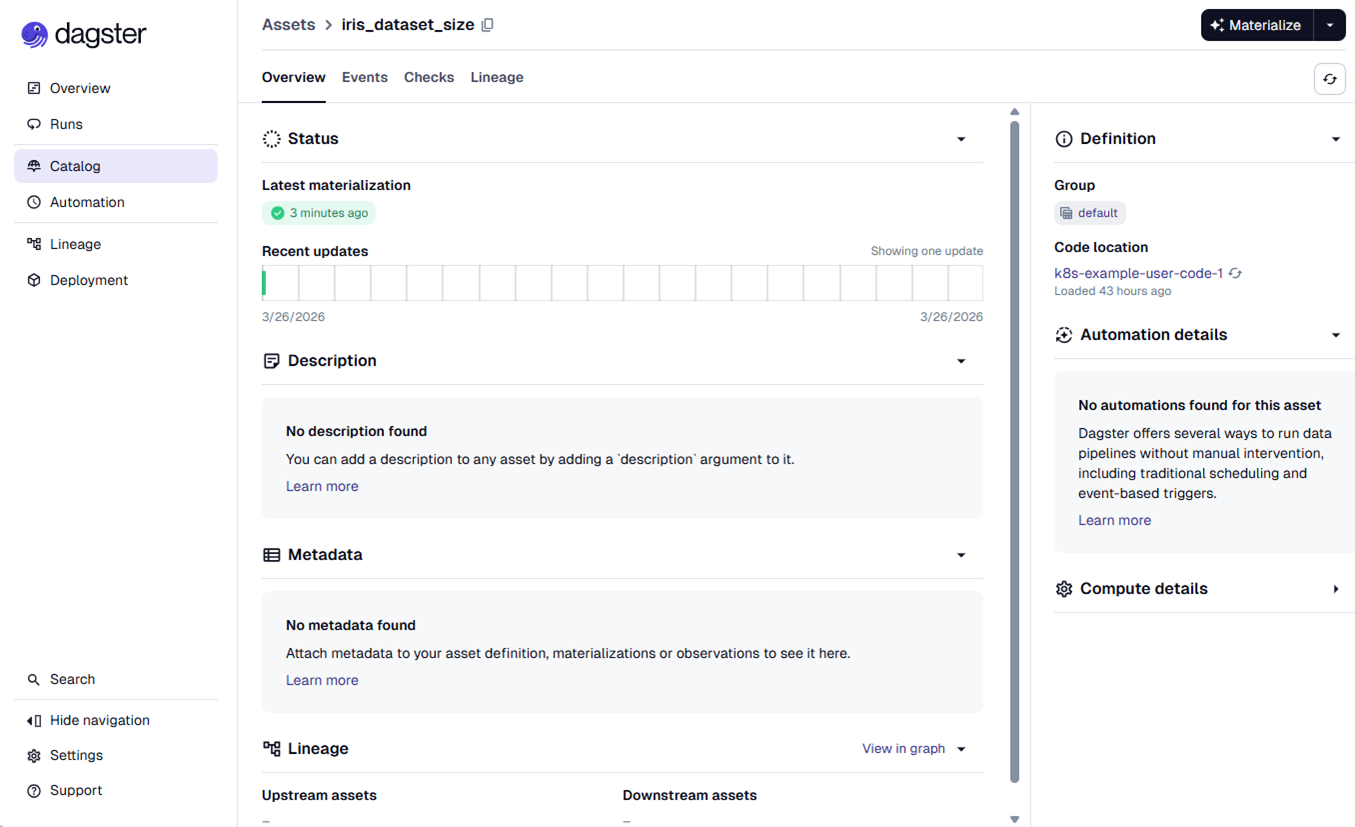
With this materialized data asset, you can begin capturing how data is transformed, joined, filtered, and aggregated throughout each stage of the data pipeline, providing a complete record of the data’s journey and its lineage. For more details on these advanced capabilities, refer to the Dagster documentation.
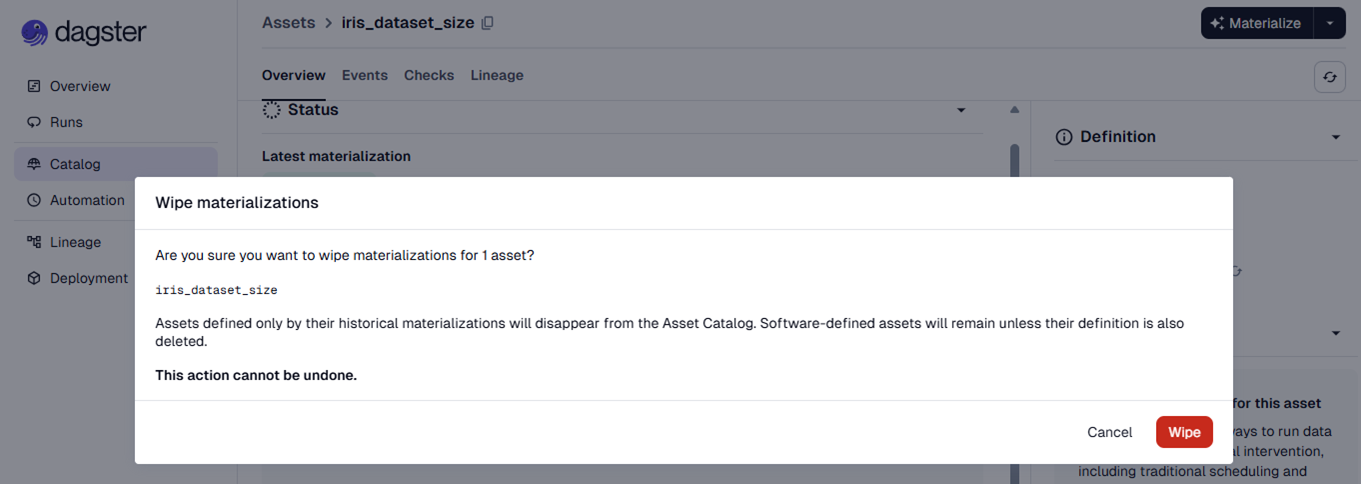
Click Wipe materializations from the selected asset to remove its materializations.
Conclusion
This blog post explored the pre-curated orchestration toolchain available within PCAI and introduced Dagster as a modern, asset-centric framework that can be integrated seamlessly into the HPE Private Cloud AI environment via the Import Framework. When deployed alongside existing orchestration services such as Airflow, Kubeflow, and Ray, Dagster operates as an additional, fully compatible orchestration layer within PCAI. Its modular architecture and clear separation between infrastructure and user code allow all user-defined pipeline definitions to be deployed and executed locally within the HPE Private Cloud AI environment, ensuring strong data sovereignty guarantees. By aligning naturally with PCAI's service model and operational patterns, Dagster enriches the platform with a clean, asset-oriented orchestration approach that enhances pipeline reliability while remaining fully compliant with PCAI’s security and governance expectations.
Please keep coming back to the HPE Developer Community blog to learn more about HPE Private Cloud AI and get more ideas on how you can use it in your everyday operations.
Tags
Related

Build your first AI Chatbot on HPE Private Cloud AI using Flowise and HPE MLIS
Jul 11, 2025Setting up Harbor as a local container registry in HPE Private Cloud AI
Jul 3, 2025
Beyond generic AI: achieve contextual accuracy with HPE's Knowledge Bases
Apr 15, 2025
Getting started with Retrieval Augmented Generation (RAG)
Nov 14, 2024
HPE Private Cloud AI: Natural Language to Structured Query Language
May 6, 2026Implementing a local LLM using S3-based model storage and vLLM in HPE Private Cloud AI
Mar 17, 2026
LLM observability and cost management on HPE Private Cloud AI
Mar 6, 2026